We are in the middle of our lengthy, but not too difficult, tutorial for a chick with it's own egg cart!
And here we are at "the Cart Part!"
Tools:
- x-acto knife
- Paint brush
- scissors
- hot glue gun
Supplies:
- 3.2 inch paper mache egg. (I get mine from German Corner.) They are great and fast. Order now and you'll have plenty of time to have these done by Easter
- Craft paint
- Tacky glue
- cereal box cardboard scrap
- Wooden wheels 1 1/4 inch ( available at most crafty stores...) 2 per cart
- Bamboo skewers
- Ribbon/rick rack for harness
- trimmings (paper trims, tiny flowers, grass for inside, etc)
Castle In the Air
Blumchen
 Step 1: Paint your egg with craft acrylic paint. Paint both halves different colors if you like.
You only need 1 half per cart.
Step 2: Glue trims around the top of the egg. If the trims are very delicate, you may want to want to skip to applying the wheels and do this afterward.
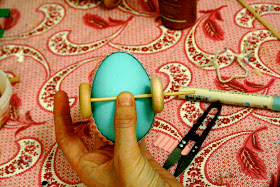
Step 3: Glue one wheel to the end of the bamboo skewer. Slide the other wheel on the other end and lay across the bottom of the cart to determine the length of your axle. Mark skewer, remove wheel and cut to length. You want your axle to go all the way through both wheels with enough room for the wheels to spin.
Step 4: Make a small cardboard bracket. Take a small rectangular piece of cardboard (1/2 x 3/4 approximately) Fold it in half an wrap it around the skewer to create the channel for the axle. Hot glue one tab down place axle underneath and mark where the other tab will need to be glued down. Remove axle and glue in place. You can paint this to match your chassis.
Step 5: When the glue is set, slide the axle back in under the bracket, and glue the second wheel in place.
Step 6: Determine the length of your shafts. They should attach to your egg just over the axle, and extend to the chicks "shoulder". You'll need to have your chick stand in for this measurement.
Cut two shafts. Glue any remaining trim that might need to go under where the shafts will be glued to the chassis. It's too hard to go around them later!
Step 7: Hot glue in place.
Step 8/9: Glue a short length of ribbon across the opening at the end of the shafts. Place the chick between the shafts and up against the ribbon. To hold the chick in place I used pretty straight pins. (Not okay for kids to play with..) So, you could also stitch, or glue, the chick in place.
Step 10: Embellish like crazy! Use your good stuff, go hog wild!
Then hold a race.....
Go! Chickies!!
Hope you make one! Let me know! I'd love to see!
xxoo,
Betty


This is adorable doll! Hope you are doing well honey. I'm having a giveaway to celebrate Spring that ends tomorrow. Make sure to enter if you haven't already, and check out Pink and Green Thursday so you can link up! Kori xoxo
ReplyDeletehttp://www.blondeepisodes.com/2011/03/spring-break-giveaway.html
So cute, please tell me your selling these!!
ReplyDeleteWell, how completely and utterly adorable!
ReplyDeleteToo cute!!
ReplyDeleteSuper cute! Perfect! Another great tutorial! Thanks for posting.
ReplyDeleteGirl, you write a mean tutorial. These are fabulous. Thank you for "racing" them at the end there - they seem to be have a smashing time of it! = )
ReplyDeleteway too cute!
ReplyDeleteI love a challenge - I just might take this one up. Good thing Easter's almost a month away.
ReplyDeleteI took liberties and used a real egg shell for the cart and pink yarn for the chick...so very sweet.
ReplyDeleteYes yes I would love one...please email me again My hubby deleted it by accident or was it....lol
ReplyDeleteOh my gosh!!! Adorable!!! Thank you so very much for sharing...i'm going to make one.
ReplyDeleteThese are adorable. Love ❤️
ReplyDeleteYou are so talented! Your creations are beautiful! ❤️
ReplyDelete