Monday, March 28, 2011

Me Made March Week 4! More and More of What I Wore.

83/365 MMM23 Hoop You Like My Blouse
NVW Overblouse

MMM22: The Table Cloth Sheath
The Tablecloth Sheath Dress

87/365: MMM27 Scallop-y skirt
Scallop Edge Skirt


MMM26: Jacket Reprised
The Jacket Again

85/365: MMM25 The NEW Shirred Shirt
The New Shirred Shirt... Tutorial is On the Way


I'm finding that I'm altering a lot of items that hadn't been finding their way into my regular rotations.
Arm and neck holes that were tight  are now more open. It's good. I'm learning so much from focusing on the real "wear-ability" of my handmade garments. I really recommend this exercise for anyone who doesn't embrace the whole of their handmade wardrobe.

Friday, March 25, 2011

I am not Slacking!

I'm Working...
74/365:FDT tassel hat edition

On a tutorial or two,
(Next Week!!)
on a bunch of Easter goodies for my lovely friends  at The Iron Dog,
and a few extra for Etsy...
(April 1st the Chick N' Carts will be for sale. No Foolin'.)

On keeping the home fires burning in our stormy woods,
with the power going out here and there.

I'm getting a little tired...

But I'm not slacking.


Wednesday, March 23, 2011

Accessory Updates Month By Month

Oh, I do hope you will all enjoy this inspiring and informative list from Constance Talbot's Complete Book Of Sewing circa 1943.


(click the image to enlarge)


I, for one, can't wait to add a pert bow to my hat...

Is it possible that these fine women restyled their wardrobe mainstays, 
stitching on new collars, cuffs and linings to coats, jackets, suits and gloves monthly? 
Bright print bolero lining with matching hat. anyone?
Wardrobe Re-Mix in absolute spades!!!

However, there is something to be said for a plan... 
and even more to be said for always looking smart!

xxoo,
Betty

Tuesday, March 22, 2011

Me Made March Monday (or Late Tuesday): What I Wore... Some More

Oooff.
I'm a little late posting.
After the Chick N' Cart tutorial (Thanks to all the wonderful blogs who have linked!) I was planning on taking a couple days to think of my next big plan,
but then we had a power outage and now... boom, I'm all behind.

So, here we are, Me Made March Monday...late on Tuesday.

Bumpkin Chic Styled 50's Frock with bloomers

Super 70's Pj's

60's upholstery remnant jacket

60's wiggle Dress 90's Styling

What,  Me Work? Tunic With Utili Obi.

As you can see... Mostly still having a grand old time,
sewing what I wear and wearing what I sewed!

Thursday, March 17, 2011

Chick 'N Cart Part 2: The Cart Part

Hello faithful readers!
We are in the middle of our lengthy, but not too difficult, tutorial for a chick with it's own egg cart!


And here we are at  "the Cart Part!"


Tools:
  • x-acto knife
  • Paint brush
  • scissors
  • hot glue gun


Supplies:
  • 3.2 inch paper mache egg. (I get mine from German Corner.) They are great and fast. Order now and you'll have plenty of time to have these done by Easter
  • Craft paint
  • Tacky glue
  • cereal box cardboard scrap
  • Wooden wheels 1 1/4 inch ( available at most crafty stores...) 2 per cart
  • Bamboo skewers
  • Ribbon/rick rack for harness
  • trimmings (paper trims, tiny flowers, grass for inside, etc)
for completely adorable trimmings, try:
Castle In the Air
Blumchen 

Step 1: Paint your egg with craft acrylic paint. Paint both halves different colors if you like.
You only need 1 half per cart.


Step 2: Glue trims around the top of the egg. If the trims are very delicate, you may want to want to skip to applying the wheels and do this afterward.


Step 3: Glue one wheel to the end of the bamboo skewer. Slide the other wheel on the other end and lay across the bottom of the cart to determine the length of your axle. Mark skewer, remove wheel and cut to length. You want your axle to go all the way through both wheels with enough room for the wheels to spin.


Step 4: Make a small cardboard bracket. Take a small rectangular piece of cardboard (1/2 x 3/4 approximately) Fold it in half an wrap it around the skewer to create the channel for the axle. Hot glue one tab down place axle underneath and mark where the other tab will need to be glued down. Remove axle and glue in place. You can paint this to match your chassis.


Step 5: When the glue is set, slide the axle back in under the bracket, and glue the second wheel in place.


Step 6: Determine the length of your shafts. They should attach to your egg just over the axle, and extend to the chicks "shoulder". You'll need to have your chick stand in for this measurement.
Cut two shafts. Glue any remaining trim that might need to go under where the shafts will be glued to the chassis. It's too hard to go around them later!


Step 7: Hot glue in place.


Step 8/9: Glue a short length of ribbon across the opening at the end of the shafts. Place the chick between the shafts and up against the ribbon. To hold the chick in place I used pretty straight pins. (Not okay for kids to play with..) So, you could also stitch, or glue, the chick in place.


Step 10: Embellish like crazy! Use your good stuff, go hog wild!  

Then hold a race.....


Go! Chickies!!

Hope you make one! Let me know! I'd love to see!


xxoo, 
Betty


Wednesday, March 16, 2011

The Chick 'N Cart Tutorial: Part 1- The Chicks!


Final Photo for the Chick N' Cart

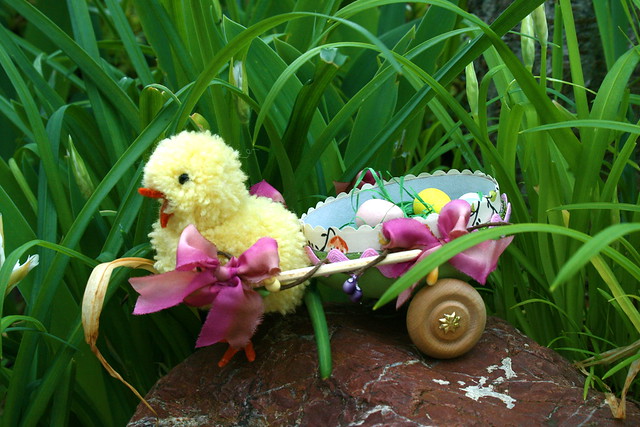
Okay, Well here we go.. My newest creation and I'm going to share this with all you lovely DIY-ers out there.
There are quite a few little steps to make this little goodie.. 
None are difficult, so don't worry about that. But it makes sense to me to break into a 2 part-er.

We start with the chick.. because a thinkin' person just wouldn't put the cart before the chick!
Now there are other chick tutorials out there, I'm sure,
but this one will guarantee your chick and cart are somewhat "to scale"

 
Tools you will need:
  • Pom pom maker (I use a Clover set)*
  • Sharp small scissor
  • wire cutters
  • a paint brush 
  • and a darning size sewing needle
  • a ruler


Supplies:
  • heavy gauge thread wrapped floral wire
  • floral tape
  • acrylic paint
  • baby weight yellow yarn 
  • Black beads with larger holes
  • small diamond shaped piece of orange felt
 Step 1: cut floral wire into a 5 1/2  and two 1 1/2 inch lengths
IMG_5889_2
  
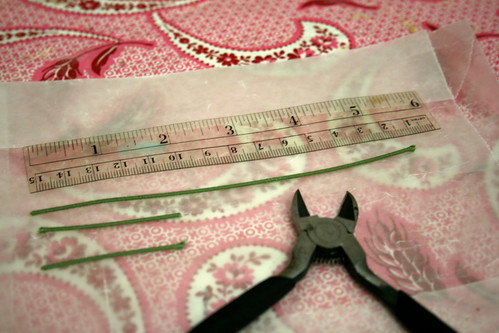
Step 2: wrap short wires around either end of the long wire so that you have  three 'toes'.
IMG_5901 


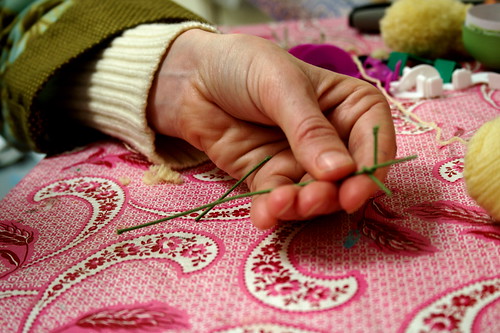
Step 3: Wrap floral wire with floral tape. I use white floral tape to  make it easier to get the color I want when painting it, but the green will work just fine I'm sure. Floral tape is very moldable, and it takes paint very well. Totally worth the small price tag.
Step 4:  Fold your legs so they look like this.


Step 5: Paint and set aside to dry. ( ack.. that blur.  photos on a dark and rainy day!)
Step 5: Wind pompoms. You need two. I use the 1 1/4 inch and 1 3/4 inch wide makers to make the head and body of the chick. And because baby yarn is so fine, I wind it double stranded to save a few seconds.
(cont.) Wind it until the center of the maker is really full. Your chick will need 'body'. The pieces need to fit back together for the cutting and tying, but they should just barely be able to.
Step 6: Cut and then tie your pom pom. (sorry it's a blurry one!) You fit the tips of your scissors in between the two sides of the pom pom maker and start snipping. Keep  a hand on the pieces as you cut so they don't pop apart. Then wind a longer piece of yarn around the center of the maker  and tie. Pull the piece of the maker out. ( The maker you use may have more helpful instructions.. and you know what they say "When all else fails: read the instructions!"


step7: Trim the pompoms.


You should end up with a ping pong ball sized pom pom and an oversized egg shaped pom pom.


Step 8: stitch the head to the fat end of the 'egg' using the yarn and darning needle. Cut your yarn pretty long. We dont want to have thread that needle again!  make sure you are going through the tied middle if the pompoms or it could break free. Nice and tight. If you cut you yarn long enough have it come out the bottom of the chick body.


Step 9: Sew the legs to the body. a few stitches on either point of the 'M', pulling tightly and fluffing afterward to hide the armature.
have the needle come out of the head where you want you eye.


step 10: Stitch the bead eyes in place. Black headed pins can help you determine where to place the eyes. move them around and find the right spots. This time don't pull too tightly just tight enough to get them set. After they are both set a little back stitch through the back of the head will hold them in place. Then have the needle come back out the front.


IMG_5917_2

Step 11 stitch on felt beak.
 One stitch in the center and one on each side, if you need it to get the right expression.


There you have it. Now make two of them!
Tomorrow you will see why two is definitely better than one in this case!


See you tomorrow for part 2... my chickadees!
xxoo,
Betty

Tuesday, March 15, 2011

The Newest Edition of The Tatters: Finished on The 15th.


the lace has been piling up...  


begging to be dissected and reconstructed...


so that something old and torn


can now, be lovingly worn.


********


And please come back tomorrow for Part 1 of the Chick N' Cart Tutorial! 
(Click to enlarge..)


We will finally answer which will come first: The Chicken or the Egg Cart.
(Hint: It's the chicken!)

xxxooo, 
Betty


Monday, March 14, 2011

Me Made March Monday: What I Wore


 Me Made Blue gingham shirt


Me Made Shirred Top


Me Made Vintage fabric Burda Dress


Me Made Japanese pants and Improv smock shirt


The Jacket That Started It All 


Click and find out what MMM is all about!!

For me it's about  proudly and thoughtfully wearing what I made!
At least one Me Made Item every day for a month!


So, How am I doing?

Related Posts Plugin for WordPress, Blogger...