Showing posts with label nesting tips. Show all posts

Thursday, April 23, 2009

Thrift Thursday: Oh I'd Like To Know Where You Got The Notion

And what to my wondering eyes should appear????


Oh Lordy... Did I ever Rock the New Vintage Thrift Boat, Baby!

50 vintage patterns! 25 cents each.

some in my size

a Tunic! 3 dresses with princess seam! Jackets, capes, handbags, Oh My!


and some little ones.


These I will want to swap. My nieces are getting too big!

(even Toys: Raggedy Ann and Winnie the Pooh circa 67...!!!)


And Oceans of beautiful Notions!

I love love love thrifting for Notions. It is so great to get a zipper for 5 or 10 cents instead of a buck or two.

and the packaging is really fun to admire

my what big eyes you have... and big hooks too!


And the joy of vintage buttons is almost beyond compare.


Extra super thrill for the ones still on cute cards!

There are a few items that are risky. Elastic and bias tapes that have been improperly stored are sometime brittle. But usually they are so cheap they are worth the risk.

And patterns aren't always complete... But some of them are worth it just for the envelopes alone.

This whole beautiful bunch of patterns and notions were from just 2 trips to the thrift store.
If you go thrifting, ask if they have a craft section. You never know what you might find!

Now my biggest question is: what do I sew first!?!

Go On, Get Your Thrift On!

Kiss For Luck,
Betty

Wednesday, February 25, 2009

Thrift Thursday and Tutorial Tuesday: My New Shade

Well..
where else would Thrift Thursday and Tutorial Tuesday Meet but WIP Wednesday?
Here is my new thrifted lamp, and a tutorial so you can make a fancy paper shade...
Just like mine!


Thrifted Lamp: 4.00
plus Paper to recover shade: 2.50
Equals Deluxe Custom Bedroom mood lighting for under 10.00
(and greenish to boot.)

Many lamps from the thrift store are fine except for shade issues. This one was pretty good but very lightly crunched on one side and dusty and cheap looking all over...

Recovering the shade with paper is a quick and inexpensive fix that works best on squared or drum shades.


This type of fix works best on shades that are in this good of condition or better. For shades that are discolored, deeply dented or torn, you would want to mount the paper onto a plastic lampshade backing or heavy bristol board white paper (using a spray mounting adhesive) and use only the metal frame of the lampshade, removing all the old fabric and lining.

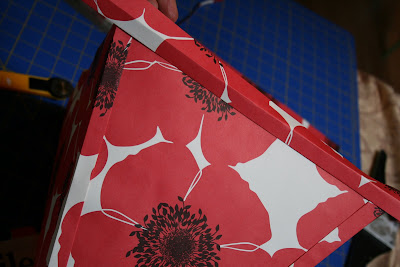
For this easier fix, I simply traced the lamp shade panels and cut them out of the pretty paper. I used a high quality sheet of wrapping paper for mine, and a rotary cutter and straight edge to cut it, for a more professional edge.


These panels were glued onto the dusted shade with a strong permanent glue stick. I used a line around the edges and held it in place manually until it adhered firmly.
I used a glue stick to avoid any discoloration or puckering that you can sometimes get with liquid glue. A permanent book binders double sided tape might also work, but only if your paper isn't too transparent.


I then cut 2 inch strips which I folded into a paper bias tape of sorts. Folding the strip in half and then folding each edge in until it met in the middle on the fold line.

You could also use a pre-made fabric bias tape in a coordinating color, as it would both look beautiful and be very easy to work with, needing none of the notching on the corners outlined in the following steps.

The paper trim is then glued on the inside fold and applied to the sides of the shade. They are mitered to exactly fit the sides with no bulky overhang.

If you are not recovering a lamp, but rebuilding one from the frame up, it would be a good idea to use a single thickness of paper glued tightly on each seam and the top and bottom of the lamp before applying this paper trimming over the top.

To apply a strip of paper trim to the top and bottoms of the shade you modify the strip by unfolding and trimming a 1/4 inch off of what will be the inside edge (That is the side of the trim paper that will be facing the inside of the shade and wrapping over the wire frame.)

Then glue the side with the fold so that the crisp edge of the fold meets the bottom, if you are doing the bottom ( Top for the top, of course) of the wire on the frame. Notch a small 'v' in the outside of the tape, Just at each corner edge, so that the paper folds neatly around the outside.
additional touched of glue will make this lay just right.

You next fold the unfolded trimmed inner paper over the wire and glue in place. Make sure your crease stays visible by not over pulling the paper to the inside. I made several small cuts to get the paper to round perfectly on the inside corners and made sure each side was well set before moving to the next. I also hid the seam on a back corner of the lamp shade.

If you are recovering a drum style shade, make these tiny cuts all along the inner edges. But if you used fabric bias tape, don't need to make any.


Place the shade on your lamp, or on your head, and do a happy dance, because you're all done and it was un-believably easy!

Thursday, January 08, 2009

Thrift Thursday: Fine Found Art


Look at the $8.00 masterpiece
(Still life of roses snapdragons and honeydew melon? Be still my heart.)
I found, that fit in the previously thrifted frame, I already had.

Thrifty Kismet.

Sigh.
It just makes me keep coming back for more.

Sunday, October 14, 2007

Just a Little Piece of a Bigger Puzzle


I just wanted to do a little something for Blog Action Day..

This is my creative reuse for some found objects that makes a oft icky reuse situation pretty easy.
I am not a natural born fan of the plastic lunch bag reuse cause. Mostly because they seemed like a huge hassle to get washed and dried. It seemed like they never came out very well. But clearly they can be reused.
For the last couple of years I have used a homemade "bag dryer" and the chore is a lot more palatable. The bags smell okay, get dry although they lose some new plastic luster (and who needs that really?), they are generally pleasant.

I use an old glass flower-frog.. These bobbles are often found in the flea market/thrift store/garage sale arenas... and some wooden chopsticks to make a dryer for our plastic lunch bags.

I just wash them with dish soap and water and dry them, thusly.
Ta Dah!


How long can you make one box of lunch bags last? A whole school year?

Every bit helps.

Related Posts Plugin for WordPress, Blogger...