Friday, March 30, 2007

Frockin' Out In FairyLand

New Vintage wardrobe project # 4


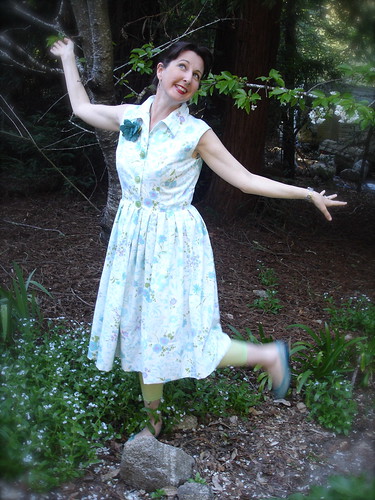
That is right a REAL DRESS!!!


Okay, I am so excited about having made a real dress. It is scary to think about these bigger projects when you see the yardage they require. Then, if you think about making a "muslin" and your local store has muslin for (egads) 6.00 a yard, that is an extra 36.00, or so, for your project. Quel Spendy, darling.


Wait, all my books say sewing is THRIFTY.. and that becomes a 90.00 dress at the CHEAPEST. ( granted.. I have seen many a multi thousand dollar garment in my styling days, so I will admit that properly executed dresses of good material for 90.00 are pretty cheap. Comparatively. But Apparently, I am pretty cheap... Comparatively.) I do hate living up to the bitter part of my "nom de blog" (unless we are discussing coffee or chocolate or deliciously snarky sarcasm about brainless celebrities and political figures, of course) so I discovered a way to work out a new pattern on the Super Cheap and if you are careful, you can wear your muslin as the playdress version.


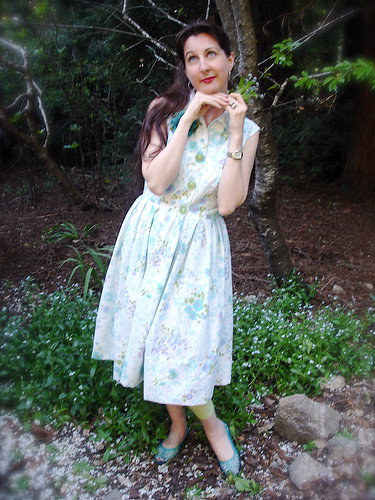
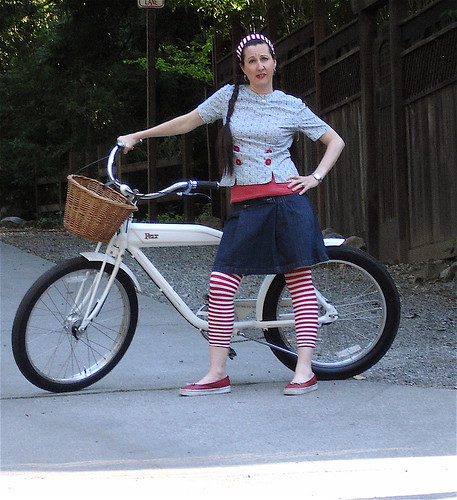
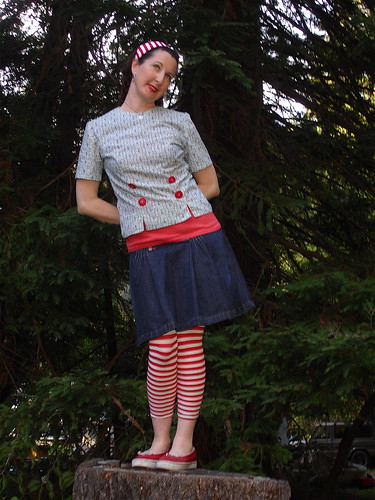
This is made from a 2 dollar vintage thrift store sheet and thrifted buttons too. (Frugal is such an ugly word.. let's say Resourceful and Clever.)


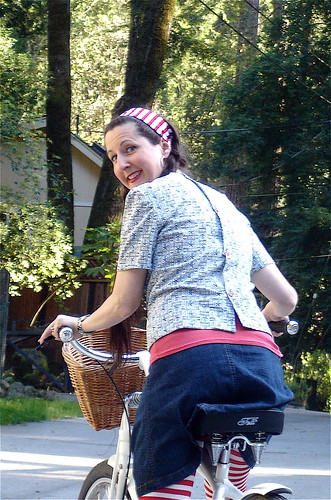
It is nice because I did have to practice (read: install it, lament, re-pin it on the ironing board with 3 times the pins, and reinstall ) to get the box pleated skirt even close to right. If I made this for evening, out of something Fancy, I would not pin, but would hand baste each pleat to get them Perfect. I would also tack each pleat to a pinboard in order to do that. It is a lot of skirt (1 hour 45 minutes to hand hem) and the pins pull loose when you hit the machine to baste it, because of the weight.


So as much as I would hate to admit to being practical ( Puh-leeze!), I am so excited that I found a way to make a 5 yard dress for 2.25. I may even start buying ugly sheets just because they are cheaper than muslin.


At least until the fabric fairies start leaving me yardage under my pillow. ( Can you believe the spiteful 'lil sprites wrecked my photo like this? just because I was going to do the Woodland Cribs for ya'll.)

Monday, March 26, 2007

SF Bay area crafters.. Wanna Play?


Last Minute Goose Egg Class at My House!?!
Come on out to the woods and get your Craft on.

Well, I said I was going to do a "goose egg" class to my craft buddy Lindy and low and behold, She held me to it..
(Thanks Lindy!):

April 1st will be my first class.
( Yep, Next weekend ... Told you it was last minute..)
So far we have 3 or 4 people.

I have room for 8 people.
Anyone else interested?

I am going to charge $30.00 plus bring a pot luck snack.
You will get to do a goose egg plus a chicken egg.. Fun Supplies Included.
I am 25 minutes from Santa Cruz and 45 minutes from SW San Jose.
We will start at about 10 am and stay until you get finished.

If you want to come play: email bitterbetty13 (at) sbcglobal (dot) net.

I also may arrange an alternative date.. I had one person interested. Let me know, and if there is enough interest I will set one up.

Friday, March 23, 2007

Funny Little Dutch Blouse

New Vintage Wardrobe Project # 3

This is latest. The Short-sleeved Windmill Overblouse.


Butterick Pattern 2325.. Late 50's Early 60's.


New tricks: in-setting a sleeve: Not too hard. Top stitching. It's easy, But you need two hands. And Go Easy On The Coffee.

Overall I like the blouse. Cute for playing around this summer. But it is boxy, and had to have fittings even after the buttons went on.. Even now as I post, I don't like what the big buttons do to the light weight material and I think I am going to back them with some interfacing because even though they are quirky, I think they "wake up" the blouse.


I had the same problem with this pattern that I had with my other one. The neck holes had to be made larger on both. Women in the late 50's must have had really scrawny necks. You can only discover this after you put the shirt pretty well together as the facing on these collars is one of the later steps. I am now fully bonded with my seam ripper. I also layer this one with a tank because I didn't look at the pattern carefully enough when I was doing the "paper fitting" ( aka: holding up the pattern to your body before cutting to make certain you won't waste you material making something that will only fit your dog.) If I had realized the slit construction was so different from project 2, I would have realized that I needed to add about 3-4 inches in length to avoid showing any belly over the top of my jeans. Nobody wants to see that... Believe me. Pasty and Yucky.

Learn from my mistakes, read your pattern carefully and fully before you cut anything out..


New favorite from the thrifted vintage notions pile: light weight rayon seam binding. I love the look of it and what it does for the hem. So much more elegant than rolled and machine stitched... yes, I am the only one that will see this but I am just loving the challenge of making the insides of the garment look good too.


The crazy photo shoot due to the fact that I hadElla Jenkins singing I am a Funny Little Dutch Girl in my head while I was finishing this up. Must have been the windmills.


As always, NVW Photo credits go to Jacob. (The neighbors think we are nuts!) They are a little blurrier than we like but that is because my photographer had detention for rough housing. Our lives of Fashion are not all glamour after all.

Wednesday, March 21, 2007

Fresh Eggs at Market.. And Postal Joy...


Well, here is what I have been up to this week: A series of decoupaged Easter eggs from an imaginary silent film about Alice In Wonderland. The are up for sale in My Shop...
Along with some $ 10.00 Goose Egg Kits which include a hand cut goose egg in box or diorama fashion and a wee hinge to put on a lid or door and some inspirational photos and instructions. I will be selling my finished goose eggs too. But these are really fun to make and pretty easy to do. A white glue and glitter kind of craft.

Had to get them in for the first day of spring and looks like I just made it!


Now every day when I go to the post office, life seems to be going my way. Here is a delightful package from my pal Lindy.
A 1940's Singer Dressmaking Guide, needle book, handmade card and the cutest swatches of her felting projects! I met Lindy at Ulla's soldered jewelry class at Castle In The Air. We have hit it off and she has taken me on a serious crafty adventure and sends me the best links via email. If she ever starts blogging ... Look Out. She will have more ideas than Martha.


Then I just got this huge bonanza from Angelina. You may recognize these from Angelina's Blog.. ( Full circle moment: Angelina also know Ulla.. Does Ulla attract the nicest people or what?) These are amazing. Thanks Angelina for being the biggest benefactor to The Project.. It is great to have a Bona Fide Fashionista cheering me on.

Speaking of which I have a few more details to finish for Garment # 3.. I am aiming for a fashion shoot tomorrow.

Ciao, Bellas!

Thursday, March 15, 2007

Button, Button, Who Wants a Button?


The Brilliant Michelle ( Green Kitchen) made me this great button for anybloggy who wants to paste it to their blogs when they show us the goodies they have been making.

I can't wait to see who cooks up what.

You may either download the button to your desktop — and then upload it and link back to our flickr group — or just email me "bitterbetty13(at)sbcglobal(dot)net" and I will send you the code.


New Vintage Wardrobe


Today has been crazy. We just got back from a ski trip and when I went to return the equipment, I locked my keys in the trunk.. Ummm, DUH. There is still trip laundry and messes everywhere..

BUT:

I have great mail to share, fancy thrift and Easter craft goodies too...
Including Egg Craftiness and Blank Cut Egg Kits soon to be in my Etsy shop.

And New Vintage Project # 3! Yee-Haw.

So, Tune later this week:
Same Betty Time, Same Betty Station.

Wednesday, March 14, 2007

tutorial: Decoupaged Embroidery Hoop

Supplies:

Mod Podge
Wooden Embroidery hoop
Assorted pretty papers

Tools:
fine sandpaper
scissors
small brush


Step one: lightly sand and wipe to remove dust.


Step Two: crease paper around hoop to center designs and to mark for trimming.


Step Three: trim paper strips to fit ( just inside the creases you made).. plan layout.


Step 4: Decoupage! First, take the hoops apart so you don't accidentally stick them together. Coat outside of the outside hoop with a medium layer of Mod Podge. Place papers on hoop and coat the top of the papers with another coat of Mod Podge. Be sure to work out any bubbles as you go.. ( i find my fingers to be the best tool for this.) Let dry completely.


Step 5: another coat ( outside of hoop only ). let dry and ...


Viola! Hoop dreams.


whipup

Tuesday, March 13, 2007

AW, Shucks!!!


Wow..
It's a good week for me.. And I want to say thanks.

I won fabric on last months challenge for Whip Up's Whiplash and that is thanks to the really nice people who voted for my recycled rice bag.

And I reviewed a pattern for Sew Mama Sew and people left nice comments there too.

And the "New Vintage" love has me all twitterpated.. Or maybe I should say, more twitterpated.

I *heart* you Blogland.

Monday, March 12, 2007

Swap-A-Roo


Lucky Me! Tumbling Blocks had a redwork swap and I got set up with Jenny!!

She noticed my kitchen curtains ( Still not finished!!!!)
and sent me a tea cozy to got with them!! ( Maybe that will help me get them done..)

Look at the inside!!!


I sent her a tote for her needlework. The pattern is a Pattern Bee freebie from the generous Vicky of Turkey Feathers..


I had fun decoupaging a hoop for Jenny's future projects.
( Note to self: Must Decoupage more hoops. Fun!! )


Saturday, March 10, 2007

New Vintage # 2: The Sleeveless Over- Blouse


Here is Pattern # 2


Made from a discontinued Freespirit paisely..off the 40% off table a Beverly's. When you are doing your first projects with a new pattern.. It never hurts to test it on the cheap stuff.


I had to modify this one quite a bit.
The trick with these vintage patterns, especially anything that is fitted like this, is how you
do the fittings.
Remember: Basting and pinning are your friends.


When I first tried this on ( semi finished) I was less than thrilled.
It was too loose, like a cotton box.
I liked the way the fabric extended on the shoulders so left those alone,
but the rest was not the modish house wife chic I was a-lookin' for.
However, it was early in the game so I took it off,
put it back on inside out and pinned at the front and side seams, until the fabric was more under control.
Then I VERY Carefully (it is full o' pins, on the inside!) turned it right side out and retried.
Hope! Excitement renewed! It looks better!!!
hooray!!!!!


Back to the machine, seam seam seam. ( another try on.. mucho improved..) Then clipping seams, pressing them in, finishing the hems and seams, More Obsessive Pressing and Voila! Blouse Joy.

( In the bad light and underwear situation I was in, I did not feel compelled to take pics. Now I am sorry. But not that sorry.)
( I promise a fitting tutorial Very Soon.)

One last shot: fully accessorised....


We have other people who are doing this project too! Angelina is rocking the vintage pattern photos and getting herself ready to play. Michelle showed me her future project and has already made the CUTEST skirts. The Lovely Violette Crumble has a whole wardrobe in the planning stages..

So I started a Flickr Group.


New Vintage Wardrobe!

Hey! Come play with us!

Thursday, March 08, 2007

housewiffery in the key of brown

There was a trip to the thrift store:


There was the application of the fantastic raw materials from the thrift store..
( cork lined drawers? how luxurious!)


Then there was the cleaning up of two messes. I used the old sales binder my husband needed cleared out ( and had been lying on the ground for 3 days.. waiting..) to house all the loose recipies I had unearthed in one of the drawers that are now lined with cork. Serendipitous? No?


Because the sun is out, there were finally photos taken of my mini mushroom farm,


and its crop.


Brown made me happy this week.

Wednesday, March 07, 2007

Mock-gritte Picks the Winners...

The bowler had to be used to draw the names.
Now a bowler reminds me of
The Unbearable Lightness of Being,
and the paintings of René Magritte..

So here ( for my amusement and hopefully for yours....) is my self portrait as a Magritte painting..


And now for the drawing:


the winners are:


Blaize, Ali,Vanessa

Please, Ladies, send me your addresses to 'bitterbetty13( at) sbcglobal.net'..
I have something perfect for each of you!

Sunday, March 04, 2007

Blog-i-versary One


Today is one year!
It has been great and I am so glad I started doing this!

Thanks to everyone who has commented and special thanks to people who I can now count as friends.
I spent today crafting it up and writing a pattern review for Sew Mama Sew.. Be on the look out for that.


I can't wait for the next year.
I will be having fun with the New Vintage Wardrobe Project **.. ( Can it be that Angelina will be playing too? Yippeee! Anyone else? Should I start a Flickr group?)
And some more new super secret projects in conjunction with some other bloggers.

I was thinking about waxing all nostalgic but I am kinda busy so, just know I love ya!
To celebrate my special day I want to do a giveaway! I will pull 3 names from the comments on this post on next Wednesday in the AM. I will send super secret ( as in: I haven't decided yet..) very juicy goodies to the names that get picked!!

PS:

** A big "Aw Shucks, Thanks" for all the great comments and A super big thanks to my son Jacob, who took the photos of me in my jacket etc... (she proudly boasts.)
Related Posts Plugin for WordPress, Blogger...